Checklist & Notes
This checklist exists to help us all be more consistent when doing tech at a Sunday or midweek service.
It might be quite hard to follow this checklist all the way through on a Sunday if you’ve not spent time getting to know it already – it is doable, but it’s better to know it in your head, and refer back to it at various points before the service to check you’ve done everything or to troubleshoot when something isn’t right.
Of course, none of this is a substitute for good training. Contact Jon or Dave if anything doesn’t make sense or you want more training on something.
Our aim on the tech team is to Glorify God and to aid the congregation in doing so. Think carefully about what you’re doing and how you’re doing it to ensure that it keeps the focus on our great God and is genuinely aiding the congregation to do the same.
NB. We’re still working on the troubleshooting section (share any issues you’ve seen and we’ll add them to the list!)
Set up audio
- Check the speakers are turned off (wall switches behind the pulpit/baptismal font).
- Turn the switch in the rack to 'CCE'.
- View image
- Turn on power for the sound desk, computer etc. (switches behind the rood screen).
- Turn on sound desk and recall the default show (Setup » Memory » Show Manager). Use '00 USE THIS SHOW'.
- Ensure all channels are muted (top soft key on right of mixer).
- Important! Plug in handheld radio mic to charge
- Power up speakers and the rack by using the switches by the pulpit, baptismal font and next to the rack.
- Power up both radio mic receivers.
- View image
- Set up music stands, mic stands, plug in instruments and microphones (see below).
- Plug mic cables into the AR2412 (stage box) first and then run to the mic/instrument/DI box ensuring that the excess is coiled at the mic/instrument end. Run cables as neatly as possible to avoid trailing cables all over the floor.
- Set up monitors (signal and power).
click image to enlarge
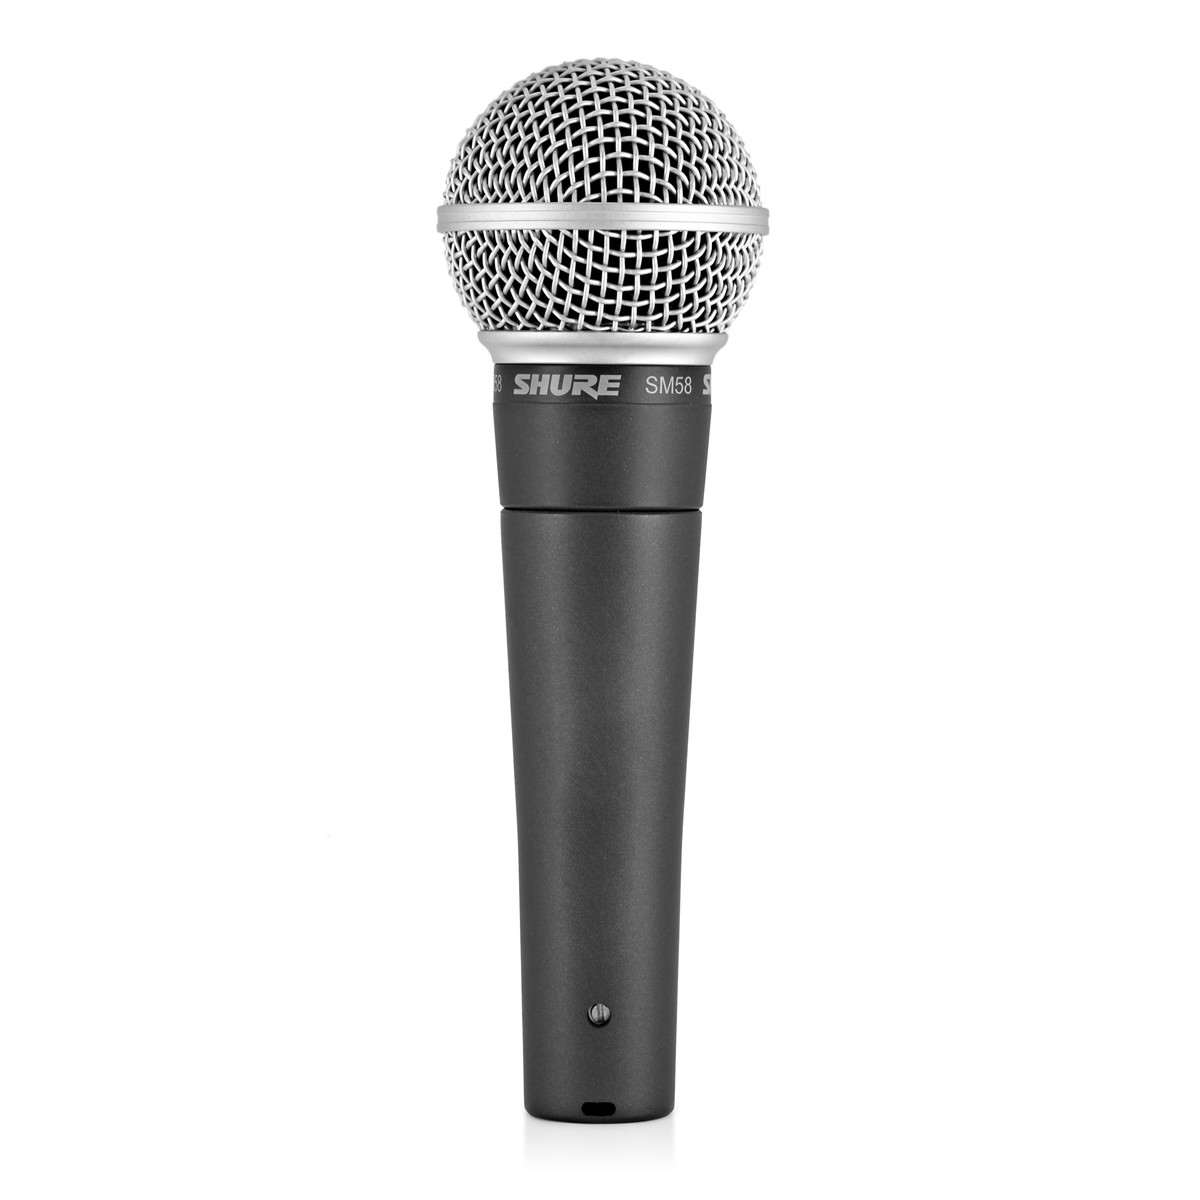
Shure SM58
Possibly the mostly widely used live vocal mic. This has a frequency response tailored for vocals, with brightened mid-range and bass roll-off. A uniform cardioid pickup pattern isolates the main sound source and minimises background noise. There’s a built-in pop filter.
Use it for: vocals. It can be used for cajon and electric guitar amps.
Phantom Power required: No.
click image to enlarge
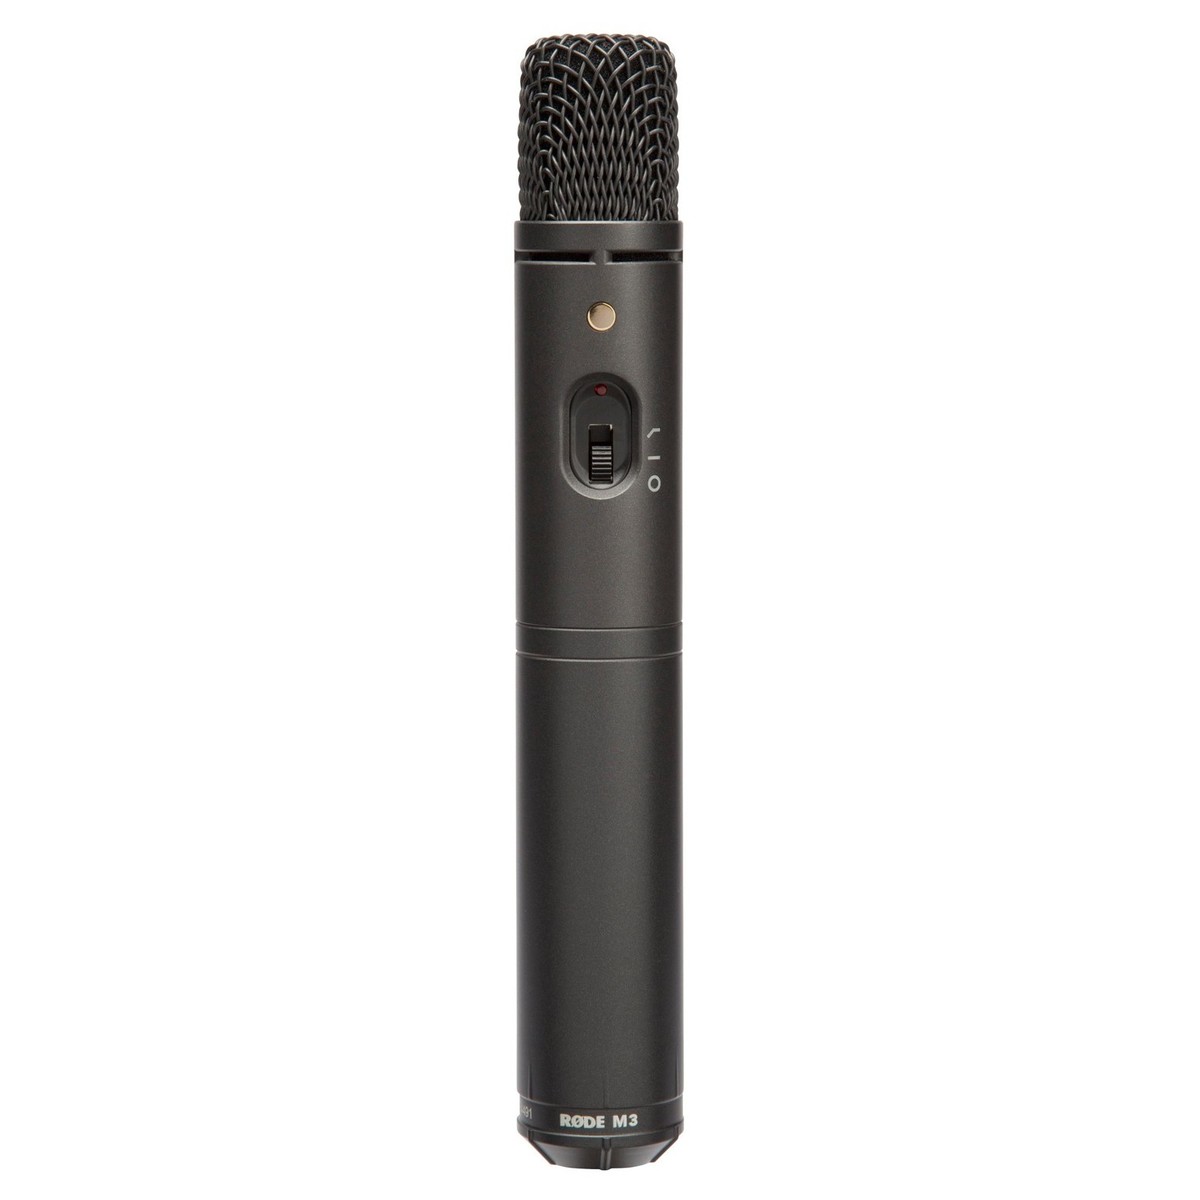
Røde M3
A versatile condenser microphone with a cardioid polar pattern and a selectable pad (-10dB, -20dB).
Use it for: it works as a vocal mic but it’s not as well suited for live situations as the SM58. It’s main use at Endcliffe will be for louder, deeper instruments eg. cello, cajon, electric guitar amp, double bass etc.
Phantom Power required: Yes
click image to enlarge
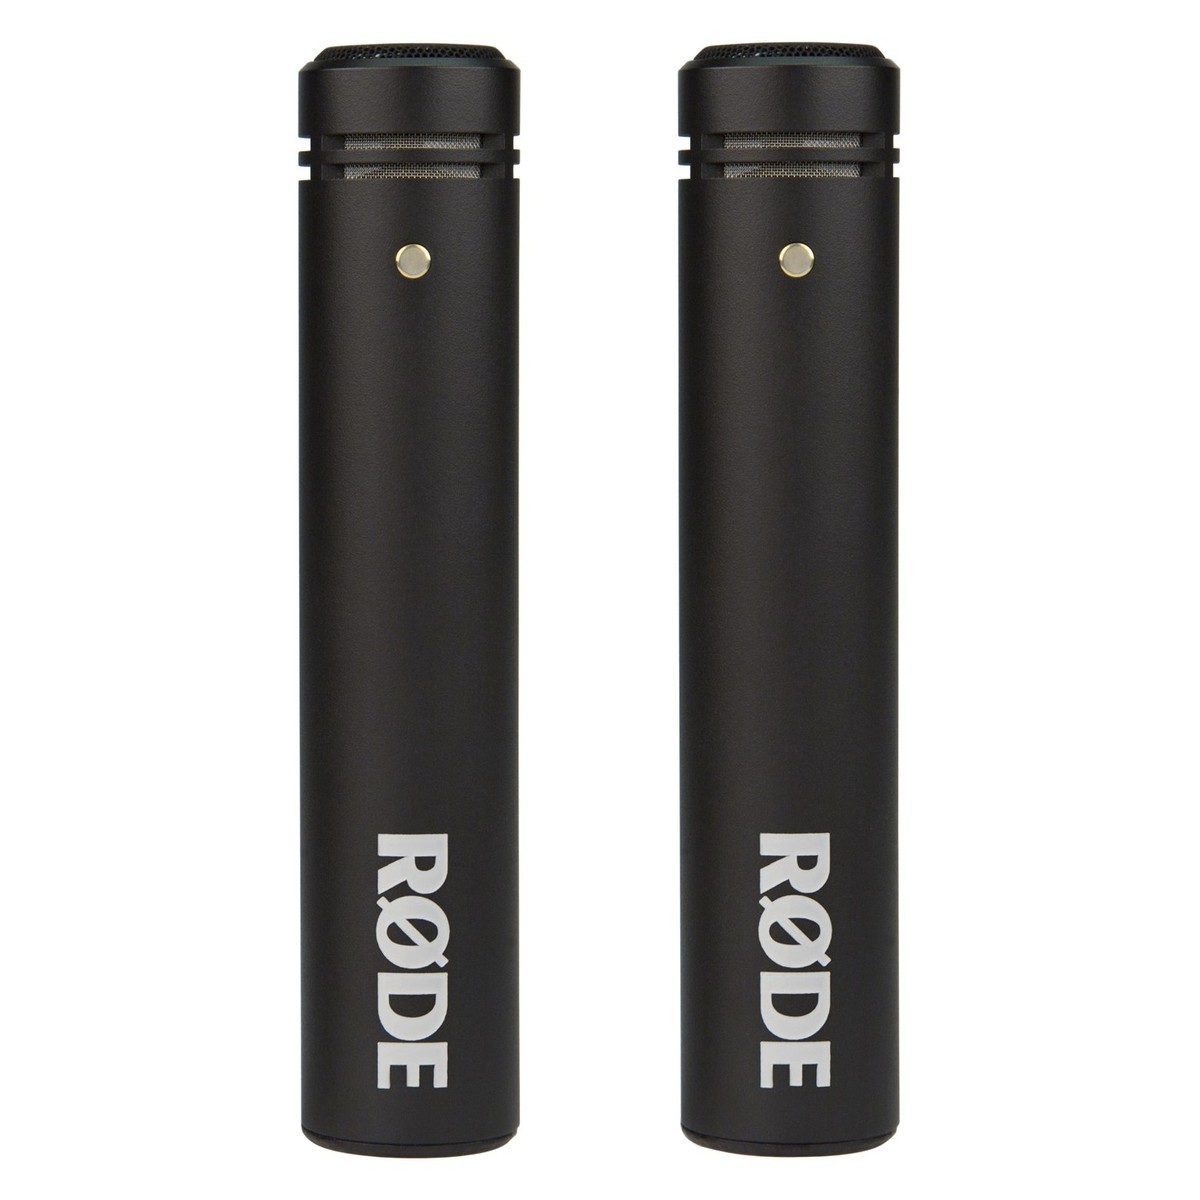
Røde M5
Small-diaphragm condenser microphone supplied as a stereo pair with a variation of no more than 1dB sensitivity between them. This makes it ideal for stereo micing a choir or group of instruments but it can also be used for a single instrument.
Use it for: mid-high range instruments (flute, violin, clarinet), choirs.
Phantom Power required: Yes
click image to enlarge
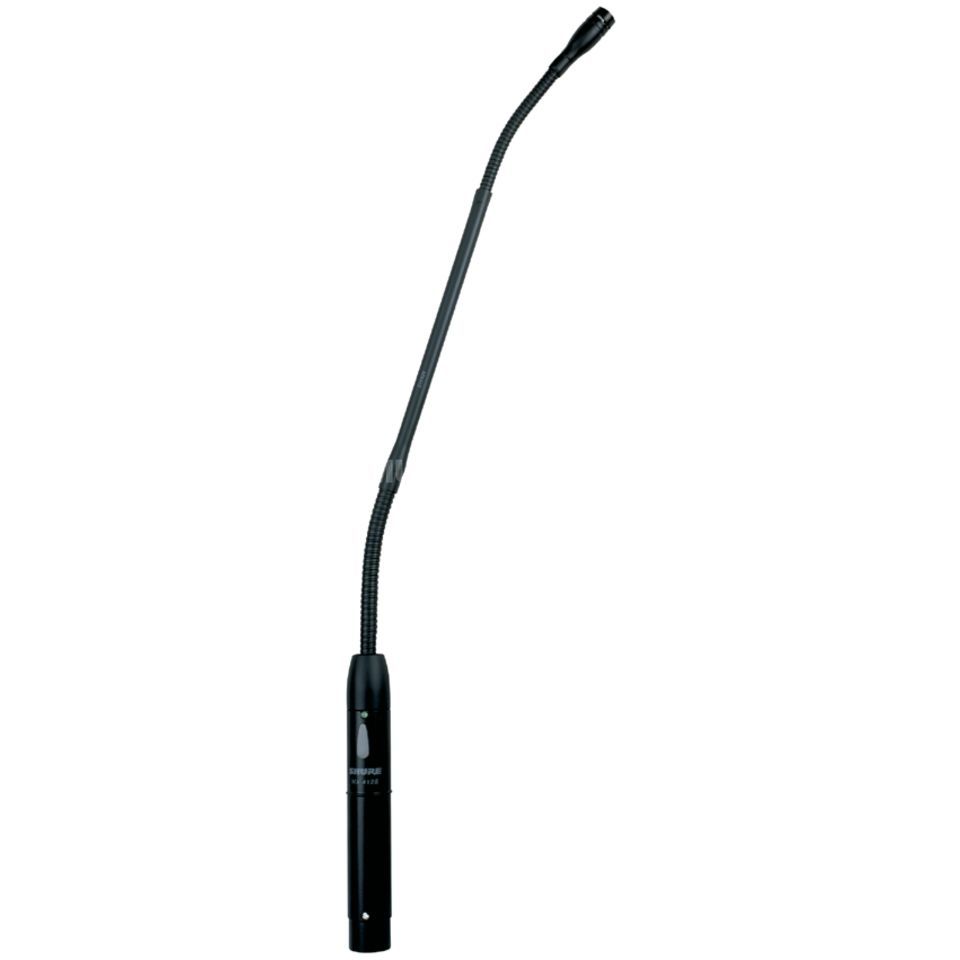
Shure MX418/S
A gooseneck condenser microphone for speech.
Use it for: lectern mic for service leader, preaching, reading, praying.
Phantom Power required: Yes
Radio mics
We also have a Røde headset mic and Røde stick mic. We actually have more than one stick mic but only two receivers so we can only use two mics at a time.
We’re waiting on a Shure wireless system but there are massively long supply chain issues and we’ve been waiting for a long time!
Set up visuals
- Pull out the screen and use the remote to bring down (if required).
- Turn on the projector.
- Turn on the confidence monitor (front pew) either with the button on the back of the TV or the remote.
- Plug the black HDMI cable (tagged St A's Laptop) into the HDMI out port of the SDI»HDMI convertor (marked with orange tape) at the back left of the desk.
- View image
- Set up the camera on the rood screen using the home made bracket.
- Route power and HDMI to the camera.
- Ensure ATEM Mini is on and power up far left TV to monitor output.
- If no camera signal is showing on the TV click the 'Key' button on the ATEM.
- Power up the Mac (power button is on the back right).
- Login (broccotech) and launch ProPresenter.
- Setup the ProPresenter playlist (click below for additional notes).
- Duplicate the template and rename with todays date and service time.
Please do not edit this template! - Import new files from the Dropbox folder.
- In ProPresenter go to ‘File » Import » File…’ and choose the items to import.
- Make sure you choose ‘Endcliffe Import’ as the library to import into (this should be empty).
- You’ll get some warnings about image files already existing – choose ‘Use Existing’.
- For each song
- Select all slides and apply the right theme – click the ‘Theme’ button top left and choose ‘CCE ninefootone. » Projector Full Screen Songs 4 Lines’.
- Right click on a slide (making sure they’re all still selected) and either check it’s got the right look or remove all looks and add again (Songs).
- For any liturgy
- Do the same as above but use ‘Projector Full Screen General’.
- Make sure the look is set to ‘Liturgy’.
- Now move the items from ‘Endcliffe Import’ to either ‘Songs 4 lines’, ‘Liturgy’ or ‘Misc’ as needed. If there’s a warning about existing files you can overwrite.
- Then you can create the playlist from the items that will be in the right libraries.
Click here for more detailed info on the ProPresenter website.
- Go to ‘File » Import » PowerPoint.
- Click ‘Show options’ before choosing a file.
- ‘Import all slides as JPEG images’ – might be useful with a very complex PowerPoint file. Once imported, no changes can be made, you’ll need to re-import.
- ‘Import text objects as ProPresenter slide elements’ – text will be imported and be editable but all media elements will be ignored.
- ‘Import Text and Graphic Objects as ProPresenter Slide Elements’ – text and images will be imported.
- NB. With the second two options, some work will still need to be done in ProPresenter. Slide builds and animations are not converted, so any slide with builds will import as the final version of the slide.
- Choose the PowerPoint file from the computer and click ‘Import’.
- Choose the ‘Sermons’ library to import to.
- PowerPoint will now open in the background and ProPresenter will give you a progress bar.
- Select all slides in the presentation
- Right-click and go to ‘Add Action » Stage’ and under ‘Confidence Monitor’ choose ‘Sermons’.
- Right-click and go to ‘Add Action » Audience Look » Default’.
- Add the presentation to the playlist and ensure there’s a blank slide afterwards (this will revert the Stage display back to the correct view).
Click here for more detailed info on the ProPresenter website.
ProPresenter has the means to automatically pull in Bible verses from installed versions. NIV UK 2011 is installed on the church machine (this is the same as the church Bibles).
To add a Bible verse/passage…
- Go to ‘Bible’ in the toolbar.
- Type the passage in the ‘Scripture Lookup’ field and hit return.
- ProPresenter will then create a set of slides (as many as needed for the length of passage). These will use the template already setup in the theme.
- Beneath the slides click ‘Save as…’ and then either:
- ‘Save as…’ to save to the default library (Bible Verses);
- Copy to selected presentation;
- Save to playlist (where you can choose)
- Go back to ‘Show’ where you can check through the slides. It will mostly work automatically but you may want to manually change some page breaks so it reads well.
If you need to quickly show a verse/passage on the fly you can add as above but before clicking ‘Save as…’ just click on the slides in the Bible window to show on screen.
Sound check
Aim: Set the gains and the HPFs to the correct values, ready to mix. This should take no more than 5 minutes unless there are any problems.
Whoever is mixing FoH should remain at the desk and talk to the band / do the sound check, and the other tech team member should be a ‘runner’ to troubleshoot any bad connections.
- Unmute the appropriate DCAs (ALL, BAND, VOX, MONS, FX).
- Ensure the Main LR Channel is unmuted and set the fader to around -5dB. That will give you some headroom so you can push up to 0db when the church is more full.
- For each input, get band member to sing/play as loudly as possible alone, where appropriate making sure the volume on their instrument is set to around 90–95% (i.e. bass guitar / keyboard). Set the fader to 0dB, then adjust the gain to a point that it is the appropriate level where you estimate it will fit in the mix. As a rule of thumb, the gain should be set so the PFL meter showing the gain will be slightly over 0dB at the loudest. It's OK if the level just triggers the yellow light briefly (see images below).
- View image (single channel meters)
- View image (PAFL meter)
- Also for each input, adjust the HPF (high pass filter). Increase the HPF until the instrument starts to sound ‘thin’, then back it off a small amount. Note that you should listen out the FoH speakers at this point and not the headphones. The HPF for anything that doesn’t specifically play in bass frequencies (i.e. bass guitar) should generally be set at around 150Hz. HOWEVER, use your ears! With no drums / bass, probably set it lower (use ears!) as there’s more “space” in the mix.
- Check with the band that all levels seem OK in their monitors for now.
Mixing
Aim: Support the band by enabling all instruments to be heard clearly, in a way that encourages the congregation to sing / worship God!
Below are a few tips but how to mix is so dependent on your ears and so can’t be reduced to a series of points to check. The right mix will vary from week to week depending on what instruments we have.
NB. Walk around the room to ensure things sound right not just at the desk, but for the congregation too (sit down on a pew and stand up!).
- At this point, unless you absolutely MUST, do not adjust the gain as it will affect everything downstream in the signal chain (EQ, Gate, Compressor, FX, Monitors) so becomes a real pain to adjust all of those again.
Our aim in all our work on tech team is to serve the congregation so that they can focus their praise and worship on God. A good mix is key to this.
Think carefully about how each instrument/voice needs to sit in the mix. Everything needs to be heard but work hard to ensure that the key things are at the front of the mix with supporting instruments/vocals a little further back.
The lead vocal should be prominent so people can sing along in tune and be led to know when to start and stop etc. (singers will further aid this with visual cues).
Backing vocals (often singing harmonies) should be dropped back a little so they add a nice layer without confusing congregations. This can vary depending on the song. A new song may want harmonies really dropped back while people learn but as they become more familiar can be pushed a little more. Again, the band will back this up as they lead.
At Endcliffe we currently have no drummers but occasionally someone plays a cajon or single kick drum so our rhythmic lead tends to come from the piano and/or acoustic guitar.
As such these need to be reasonably prominent in the mix to help people keep in time but they probably want to sit a little below the vocals. As a rule of thumb, the guitar should sit a little behind the piano (if there is one!) to avoid too much of a wall of sound.
Listen well in rehearsal to see whether the piano is doing more lead melody or the guitar is adding some picking melodies and adjust the mix (often on a song by song basis) to ensure things sit well. Keep an ear out for changes and increase or decrease the individual instrument levels accordingly.
We’ll often have one or more melody instruments (flute, violin, clarinet, trumpet, electric guitar, cello – see also ‘Bass’ below). These are most often used to play harmonies and to ‘fill in the blanks’, either playing music motifs or the melody line in intros/links/outros.
It’s helpful to ensure they don’t compete with the lead vocal but instead are used as a complimentary element to add interest to the mix.
Do be ready to ‘ride the fader’ and adjust depending on the song/part of the song but do so subtly! For example, you may well want to push up a little in the links but listen for what the player is doing.
This may come from the bass guitar or sometimes a cello. Again, listen to how these are being played on the week you’re on and adjust accordingly. They’ll naturally sit under the mix due to their sonic frequencies so ensure they’re there and adding to the mix without being unduly prominent.
Think carefully through each voice/instrument and whether it’s low, middle or top end. The nature of the instruments and how the band arrange songs will impact this but a good mix can help to create space and enable all elements to be heard rather than being muddy.
As a very basic overview…
- Bass, double bass and cello will all sit nearer the bottom end. Depending on player and song, keys can sit here too (or the lower octaves at least).
- Guitar, keys, male vocals will tend to sit in the middle of the mix in terms of frequencies.
- Keys (!), melody instruments and higher female vocals will sit at the upper end of the mix.
Use this to guide your EQ settings both to enhance an instruments natural space in the mix but also to ensure you don’t overdo things (eg. making an already high violin sound harsh). See below.
This is a really complex area but will have a huge impact on how things sit in the mix. Again, just some general rules.
Don’t overdo it – if you apply changes do a quick check and take the EQ out – does it really sound better?
High pass filter – we have a very resonant building (and a decent subwoofer) and lots of low bass sounds can quickly swamp the mix. Use the HPF on pretty much everything in the low/mid range just to roll off some boomy frequencies.
Get a ‘clean’ mix – avoid boosting low mids (e.g. 200hz – 500hz) at all costs. Always think, ‘Could I cut in this area without it sounding too thin in the mix.’ If you can get away with it – cut it – it will sound better.
If you’re struggling with some nasty sounds or something isn’t cutting through in the mix use this little guide. Don’t overdo this! As a general rule you’d be better to cut frequencies rather than boosting where possible. eg. cut frequencies to remove sibilance and nasal honk rather than boosting vocal intel frequencies.
- SHEEN 12KHz to 16 kHz
- SIBILANCE 5 kHz to 8 kHz
- PRESENCE 3 kHz to 5 kHz
- VOCAL INTEL 800 to 2000 Hz
- NASAL HONK 400 to 600 Hz
- TUBBINESS 200 to 400 Hz
- BOOM 80 to 200 Hz
- DEEP BASS 30 to 80 Hz
See below for more detail.
- Sheen is that metallic sound of cymbals or violin strings at their highest frequencies. Add a bit more Sheen (maybe +6 dB) to make cymbals sound more alive.
- Sibilance comes from an exaggeration of sound that projects from the roof of the mouth. You can tune it out by sweeping the frequency knob with gain knob boosted about 6 dB. Then listen for the really offensive point on the frequency knob and cut it by -6 to -12 dB. Be careful not to overdo this and risk removing vocal intel (there is overlap with all this!).
- Presence frequencies can make an instrument stand out in the mix without increasing its overall volume. So add maybe +3 dB at 4 kHz to give a vocal or guitar more “punch.”
- Vocal Intel frequencies are where we understand the words. So you can apply +3 dB of boost around 1,000 to 1,500 Hz if you want words to be more intelligible. Again, be careful not to overdo this. In our church building we have some feedback issues around 1000Hz so boosting here can cause issues.
- Nasal Honk is that nasty group of frequencies that sound like you have a cold. I generally cut a few dB around 600 Hz to get rid of the honk on vocals and percussion, especially on kick drums.
- Tubbiness can happen to instruments such as acoustic guitars that are shaped like a tub. I generally cut a few dB around 200 Hz to clean up the lower register of the sound.
- Boom can be useful on shell and floor toms, but not so much on snares. So I’ll often get rid of some of the 100 to 150 Hz tone of a snare drum, but I’ll probably boost the floor toms a bit in those frequencies.
- Deep Bass is usually reserved for kick drums and bass guitars. But do your boosting sparingly since it’s easy to overload the woofers in your PA system. Let your ears be your guide.
Speech
Aim: Now the band is working and happy, set up the speech requirements for the service. One person on sound desk, other speaking into mic.
- If you've been running the sound check at -5db turn up to 0db to check the speech.
- Plug in the lectern mic.
- Ensure the wireless mics are charged up and working (use the battery checker to see if the headset mic belt pack needs changing).
- If the band are playing, check the mics over PAFL (in the headphones) and test the mic over FoH when they are at a break in between songs.
- Convince yourself how loud you can turn each speech mic before feedback occurs, so you know the limit of the fader.
Double check
Aim: Double check that everything is correct, and you haven’t missed anything!
Audio
- Check that all instruments are audible.
- Double check that what you are hearing is out of the FoH speakers and not the monitors.
- Ensure the main LR is set to around the 0dB mark.
Visuals
- Check the projector is still on / working.
- Check the band leader is happy with words / lyrics. Be particularly aware of songs you are unfamiliar with so that you know any verse/bridge/chorus repetitions..
- Ask if the band will play a song before/after the service.
Pre-service
Aim: Make sure you’re happy with everything that’s happening (both visuals and audio) and that leader, speaker, prayer, reader etc. know what mics they’ll be using.
Audio
- Check what mics are required – typically different for children’s slot.
- Discuss mic placement with leader, speaker etc. and make sure you have a discussion with everyone who will be using a mic with regards to placement.
- Check about any videos that might be played – see if the audio from the video is overly loud or quiet and be ready to adjust accordingly.
- Start some pre-service music (played from ProPresenter) if the band aren't playing.
- Be ready and alert at least 5 mins before the service starts and keep your eyes and ears open!
- Start recording (see below).
Visuals
- Check if there are any videos. Are they loaded properly into ProPresenter so they can be played with a single click? Check the inspector to ensure they're not set to loop!
- Start recording (see below).
- Be ready and alert at least 5 mins before the service starts and keep your eyes and ears open!
During the service
Aim: Make sure you’re happy with everything that’s happening (both visuals and audio) and that leader, speaker, prayer, reader etc. know what mics they’ll be using.
Audio
- Ensure that the Main LR is set back to 0dB (or the level at which you want the service to run).
- Make sure the inputs are on in time – it’s good to unmute things slightly early to avoid missing anything.
- Adjust the mix as necessary now there are people in the room which will change the acoustics (normally in a positive way!). Don't be afraid to turn things up as people will absorb a lot of the sound.
- Approaching the end of the service, have music ready to play or be ready to turn the band on/off. Music should be played ASAP (within a few seconds) after leader ends service.
Visuals
- Advance the slides – during songs change to the next slide whilst the last few words in the slide is being sung – pay attention!
- Be in communication with person on Sound Desk with regards to any videos, pre/post service audio.
Recording
Audio
- Plug the USB stick from the laptop bag into one of the ports on the desk.
- Check that the 'Rec' output is turned up (Layer D on Bank 2).
- Go to 'Setup » Audio » USB Audio'.
- Click the record icon and apply to start recording.
Video
- Plug the hard drive into the back of the ATEM.
- Check that the 'LiveO' output is turned up (Layer B on Bank 2 on the sound desk).
- Check you're getting audio to the ATEM (you should see levels on the far left monitor).
- Press 'REC' – the monitor will give confirmation in the bottom row of the grid.
- After the service return the hard drive to the church laptop bag.
Setting down
Audio
- Shut down the desk by pressing the 'Power Down' button on the touch screen, confirming and then switching off at the power switch (back left).
- Put the radio mics away (stick mic in the zip case and headset in the box with the belt pack).
- Put radio mics in the red plastic box and place in the crate to go back in the cupboard.
- Coil all cables using the over under method...
- Watch video
- Put microphone stands back in the tubes with the feet at the bottom and the mic clip at the top.
- Put music stands back in the space next to the mic stands.
- Set the network switch in the rack back to St. A's.
- View image
Video
- Turn off the projector using the remote.
- Unplug the HDMI cable from the SDI to HDMI convertor and plug back into St Augustine's silver USB-C to HDMI convertor.
- Shut down the Mac (Apple Menu » Shutdown).
- Turn off the wireless mouse.
Troubleshooting
Work in progress! First question to ask – have you ‘turned if off and on again’? It’s surprising how often this works!
Audio
- Is the network switch set to CCE and not STA?
- Are both the FOH speakers powered up?
- Are channels or DCAs still muted?
- Restart the desk!
- Check the jack cables are fully inserted into both the keyboard and the DI box
- Check the pad buttons on the DI box to make sure it’s not cutting more db than needed
- Check the ground lift on all DI boxes
Video
- Is the projector on?
- Is the HDMI plugged into the convertor on the tech desk?
- Try switching the Main Output screen in ProPresenter to a placeholder and then back to ‘UltraStudio Monitor’.